OP
Black Hole
May contain traces of nut
4.7uF 25V. I would buy more than one!
There's a risk of damage to the board with cutting, in particular you may lift tracks - which is really bad news. Provided the soldering iron is intended for electronics work and is 25W min (say 50W max) you would be better desoldering. Some skill is required, but you say you've had some previous soldering experience, so you should be ok. Applying fresh solder will help get the heat into the joints and increases the thermal mass, so aim to work quickly on either side in turn until the cap can be shifted with some light pressure. If you haven't done it within two minutes, stop and try again when things have cooled down (you don't want to overheat the board). You don't need to remove the board, but be careful to keep the iron away from nearby cables connecting to the HDD (maybe shield them with some cardboard). For a really neat job, after removing the cap use desoldering braid (about 3 mm wide) to clean the excess solder from the pads, then a cotton bud dipped in white spirit to remove flux. Good luck.Hi, it seems I'm the latest to have this fault and thank you to Black Hole for advising me in another post. I have gone through this significant thread with all the information, thank you to newcoppiceman for his original diagnosis work. I am planning to replace the 4u7 capacitor but have not soldered for many years. I do have soldering iron with a small thin bit and I need to buy some solder. I see that care is needed in removing the old capacitor either by desoldering or cutting, is there a preferred method? Also, can the fix be applied with the board in place, or do I need to remove it to apply the fix?
I think that would be tough. Possible, but access is limited.can the fix be applied with the board in place
If you can find any, I advise traditional "multicore" tin-lead solder with flux. Much easier to work with than the modern lead-free stuff, and still legal for rework on old equipment. It's almost impossible to use lead-free solder where tools or the workpiece are contaminated with lead, but not the other way around.I need to buy some solder
That's interesting, thank you. It's been many decades since I did any soldering and although I still have my soldering iron somewhere from what you say I might need to throw it away and buy a new one? I suspect I need to do some on my HDR-T2 (the fan no longer works but the fan itself is fine, so I'm guessing a capacitor in the power rail for it has gone).Much easier to work with than the modern lead-free stuff, and still legal for rework on old equipment (it's impossible to use lead-free solder where tools or the workpiece are contaminated with lead).
Well done for tackling and not being frit.Thanks newcoppiceman, pleased with myself fixing delicate electronics. Usually more a hammer a woodscrew person.
Search for "Ersin Multicore" on a well-known auction site. Go for the 1.2mm rather than 0.7mm type, unless you intend to major on really fine work.Where might one find proper non-RoHS solder?
Yes, well...However I then (very silly) tried to push the capacitor to a neater position, and have pulled one of the pads from the board!
Oh yes. The "WTF did I do that?" result. Been there more than once. I think I usually clawed it back eventually, but it was always hard and/or a lot of work.However I then (very silly) tried to push the capacitor to a neater position
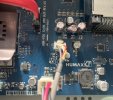
Any chance you could take my board image and indicate appropriate pads, including polarity? I’m guessing the 10K is the tiny component near the S B on the edge, but is the negative of the capacitor to the S end or the B end?Yes, well...
If you can identify the 10K resistor from the circuit diagram in post 91, tack across that (or the FET pins, if they're easier). Make sure you get the polarity correct.
No chance at all. Some of the interconnecting PCB tracks are buried inside the board, where no photo will show them. Also, I can't make out any component markings in that snap. To identify which connects to what, you need a "bleeper" (continuity tester / multimeter). Some components might also be on the underside of the board.Any chance you could take my board image and indicate appropriate pads, including polarity?
S/B? That seems to imply the pads are horizontal to each other, whereas what I see in that photo is them arranged vertically. Also the cap near the S/B markings is the wrong one (as you said yourself, the 4.7uF cap is near the "5"... if that's the correct 4.7uF cap!).is the negative of the capacitor to the S end or the B end?
Look for continuity between pins on two resistors and a FET. The circuit diagram sketch I referred you to provides the clues (the cap is shown with its negative to the left – the line as opposed to the box, which represents the positive terminal).need to know alternatives to put the negative leg instead of the destroyed pad.
You would never fit a non-electrolytic 4μ7 cap on the board! As to whether you can get away without one, that's a moot point. My view is manufacturers don't waste money on parts not needed.if a new one is required whether it can be any type of cap or has to be electrolytic?
Job done, but I couldn't change the 4.7uf capacitor. My trusty Weller TCP iron and finest bit work, but I don't trust my seventy plus year old eyes any more, so I did a work around and fed the 12v from a separate supply. A bit of a cheat, but I thought KISS and it does the job. Now to do a backup of the stuff I want to keep and free up some space on the HDD.